|

Tutorial 1: Step 3 View Parameters and Rename Experiment
View Experiment Parameters
Thinking ahead, what would happen if you tried out six different normalizations on the same dataset today, and then came back in tomorrow and wanted to re-examine those results? How would you determine which node on the experiment tree corresponds to a particular analysis sequence?
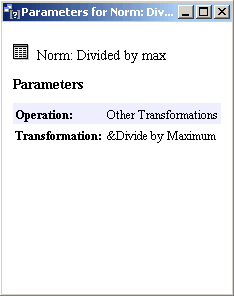
You can always determine which parameters generated a certain node on the experiment tree by right-clicking it and selecting Show Parameters from the shortcut menu (or by clicking the experiment and selecting Show Parameters from the Tools menu). Try this now.
When you click on an item in the Experiments navigator, look at the information displayed about it in the Description Pane (lower left). It is similar in content to the Parameters dialog.
Rename an Experiment
Default names are provided for all datasets and experiments based on either the name of the file being imported, or on the type of experiment being performed. Any item listed in the navigator can be renamed at any time. This gives you the opportunity to apply your own naming convention to the data.
1. Right-click the Normalization item that was just generated in the Experiments navigator, and select Rename Experiment from the shortcut menu. A box is drawn around the item with a blinking cursor at the end of it.
2. Press (and hold) the <Backspace> key to delete the program-generated name, and type in something significant to you (e.g. 'Divided by max' or 'maxdiv'). Press <Enter> to accept this new name.
Note: GeneLinker™ saves all files automatically. Once an item is visible in the Experiments navigator, it has already been saved to the database.